top of page


Greetings! So, my wife and I are into a Medieval Re-creation group known as the Society for Creative Anachronism (SCA). Also, I was a professional jouster for six years. In those six years, I broke 13 bones, turned two vertebrae, tore both biceps, broke 3 teeth, had numerous cuts and minor wounds as well as enough concussions to have minor brain trauma. Since 'retiring' from that, I was thrown from an 1800# Percheron, into a wall, landing at his feet which scared him and as he ran away, he quite literally crushed my leg. Now, don't feel bad for me, it was all my doing. I only mention this so you can see why the 2-3 hour camp setup and tear-down for the SCA weekends, is getting to be too much for this ol' broke-down body to manage. Our solution? There is a growing thing called "Tiny Houses". Some of these take the form of portable houses on trailers. There are others that are called 'vardo' trailers which are a old-time, gypsy looking trailer. So we thought, why not do this, but make it look Medieval? So...

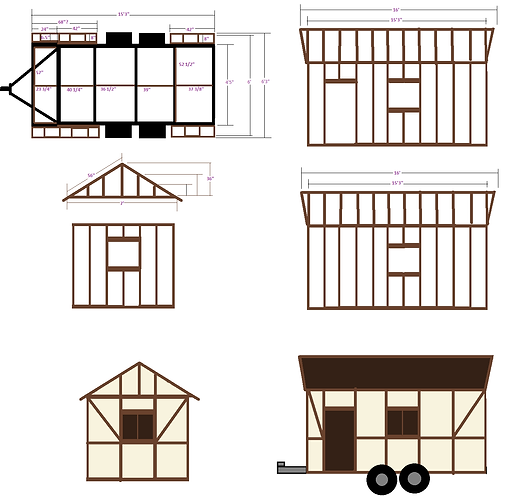
First we had to decide on what style: Viking, Gypsey, Tudor, etc. We decided to style ours based on a Saxon home like this one.
Then we needed a trailer. Found this one on Craig's List.


Then the planning stage.


Now the build starts. First I added wood cross beams for support. The trailer was only 4' wide so I also added extensions making it 6'3" wide.

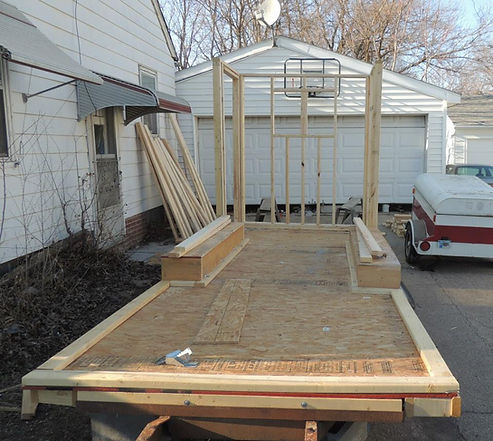
I added the plywood floor and a 2"x4" base for the wall framing. I also started the wheel well covers.
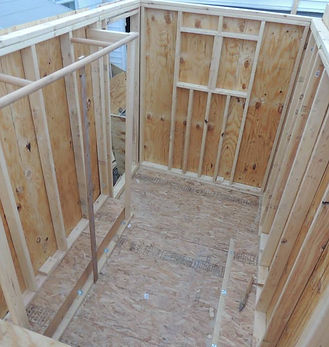
Here you can see the wheel wells finished and the framing started. The door is on the left and there will be a double window at the back.
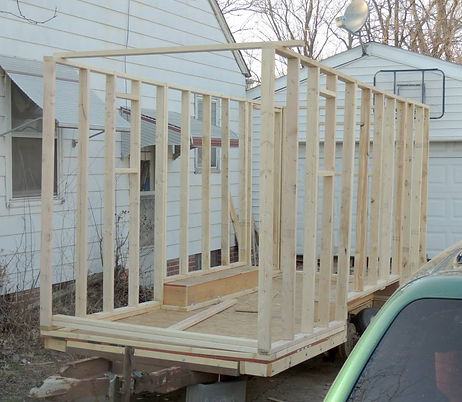

And another day's worth of framing brings us the rest of the side walls with the two windows on either side. I could have got more done, but ran out of wood!
Oh, a side note on the wood. Transporting it in a Honda Civic is not necesarilly a smart idea...

Now that I have a broken windshield and more wood, back to the build...


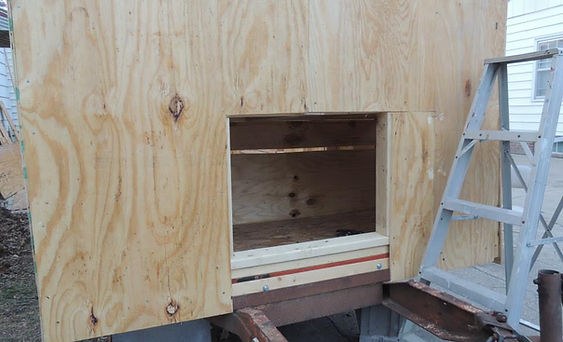
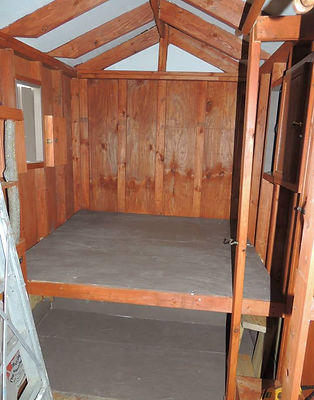
Fraiming is done. Before adding the walls, I decided to add the bed frame and closet. Initially I was going to make the bed split in half on hinges so we could access the entire underneath for storage (especially the spare tire and jack). I quickly found that this meant leaving out too many of the support beams for the bed.
Instead, I made the bed top solid, and added an opening to the front wall frame. I'll put a door on this that will be accessible from the outside. In the end, this comes with many advantages; namely being able to get to the spare if we need to, but others as well. More on those later.
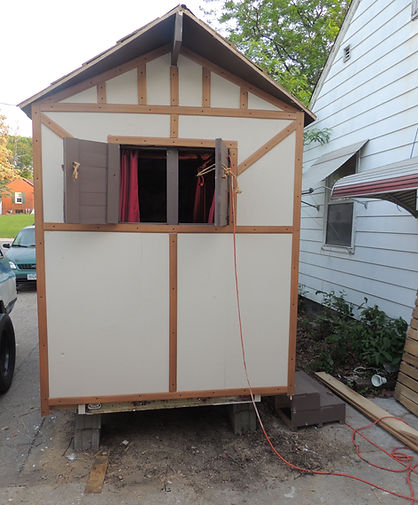
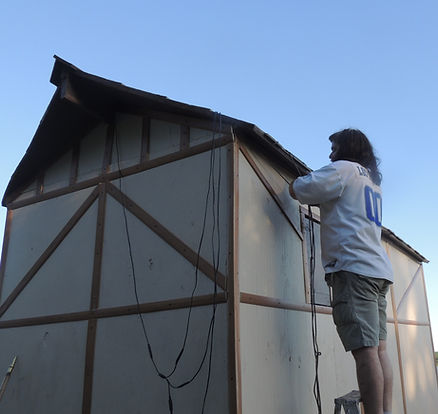
I honestly had no idea how I was going to pull off walling this thing since I am doing the work by myself to this point. It took me most of the day, but I actually managed it. I still need to get the recprocating saw and cut out the windows and even up the top, but we have walls!


Not too bad for 12 days of work.


Not much to show today. Windows cut out, top trimmed and exterior caulking done. Hmmm... What next? Paint or roof?
Welcome To:


Roof beam added. Or rather, re-added. I lowered it a foot from my original design. But it was still too tall. So I lowered it another foot. I like this much better.
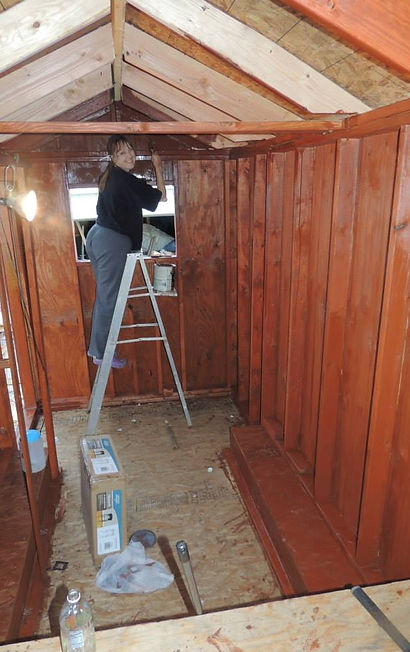
It was misting all afternoon. So I made the windows and doors in the garage. I actually mis-cut the door and ran short on wood. So now the wife gets a window in the door. She likes the mistake.


The rain finally stopped. Well, mostly. Getting the plywood on the roof was going to be an issue unless I found help. Then I figured out it I put it up first, then did half the roof, move it to that side and finish the other half, I could do it. In theory. And it worked!
I explained to my mother that I don't NEED to do this by myself, but I don't know when I'll need help until I am finished with the step before needing that help. At that point I can wait around hours or days until help can make it, or I can figure out a way to do it myself. I have A.D.D.. Me? Wait???
Break time. Got a center beam up for a little extra support and three sets of trusses. Got a drink, some ibuprofin and posted. Now back to work...


Got most the roof done thanks to childhood friend stopping by not 5 minutes before I needed to put the first sheet of plywood in place! There is a 3' section that I need to go buy more wood for. We tarped that for now. The front overhang is way larger than it will end up. But I had to position it so the other end is on a beam for the middle pieces.
Here is also a view from the inside. If this wasn't going to have a Medieval theme, I would SO make those openings, sky lights!!!


Big day on the build. I got the roof finished, got the peaks done and the door for the cubby. We also found the trim for the outside. Its a very light, fake wood (polystrene?) that the guys said is nearly indestructible. Its a little more expensive than what we found at Restore. But won't need paint, will never rot and we can find enough matching to do the whole place
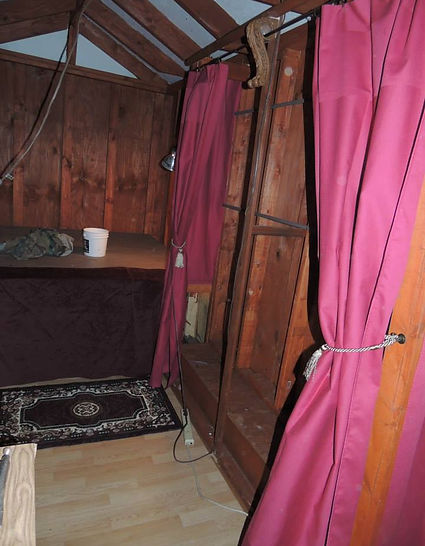
The wife has RA so hasn't beem able to help much on the build so far. She was very happy to be able to start really helping today as we stained the inside.
Inside stained! LOVE how this looks!!! The bare board at the top will be painted to match the outside
We also found this at about 70% off because it was a floor model. Needs some wood glue on it, but eventually we are going to add solar panels and a battery to charge phones, run a fan and now, run our 'fireplace! lol
Stairs! We have stairs!

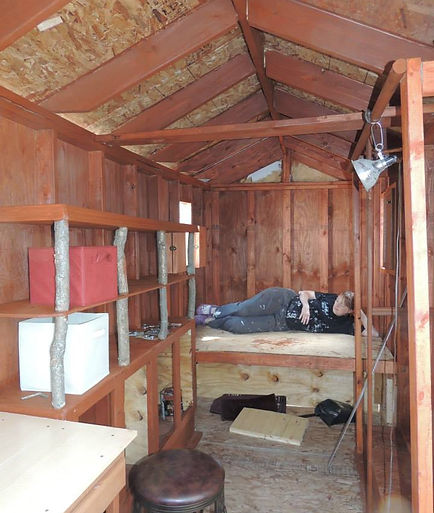
New today: Base Cupboards (waiting on hinges to attach the doors, shelves, vanity (minus mirror), stool, and 3 cupboards next to the bed windows.
One coat of primer done.

Storage area done minus staining the latches. Initially I had ropes around the logs to hold the boxes in, but the wife didn't like it. Good chance we'll just sit them on the floor for travel.
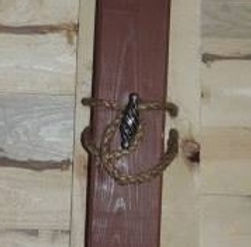
Windows, window sills, door and door frame up! Simple ropes over a door pull for a locking mechanism. Doing the same for the other windows and door.
Big day for the build. All the brown painted: door, door frame, windows, window frames, under side of roof and center roof beam. Oh, and stairs.
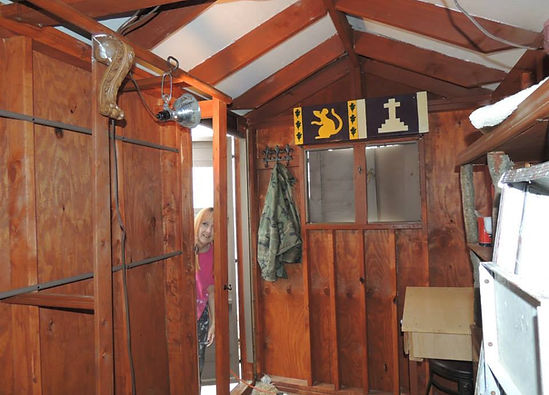
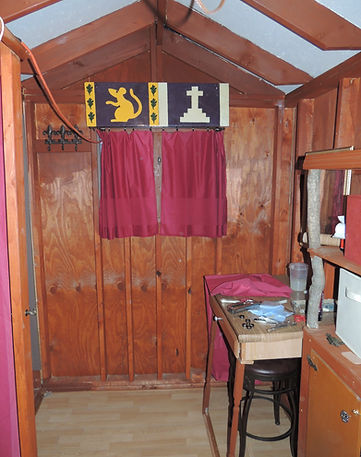
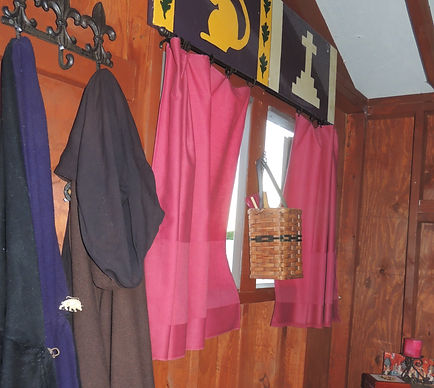
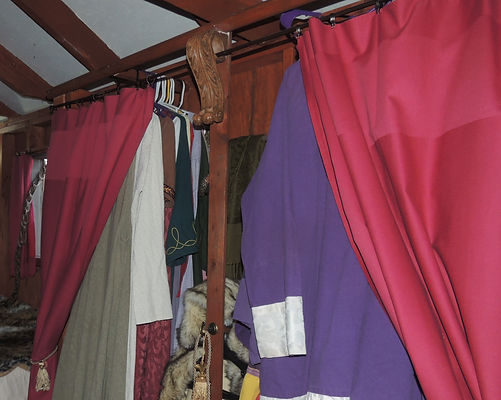
Lots of new things. Inside roof primer finished. Windows painted, Cloak hanger up, and a fancy curtain rod holder. Plus some dowling across the back of the closet for hanging things like pants
Painted the bed and floor under it that won't have the fancy flooring. Hey, we bought 2 gallons and still haven't touched the 2nd

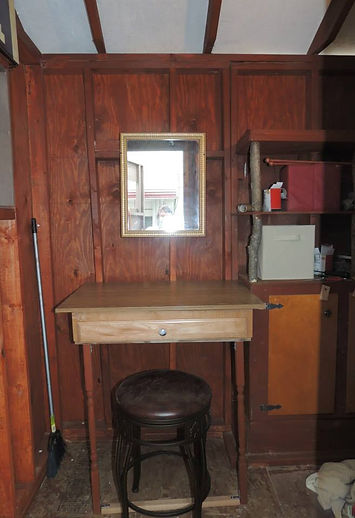
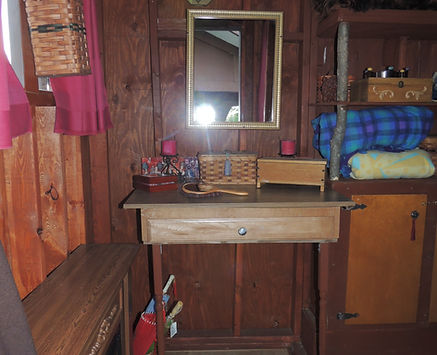
Vanity pretty much finished. I'll put a piece across the back to stop things from falling off, but otherwise, its done minus whatever decorating the wife does.
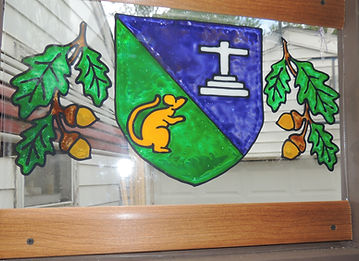
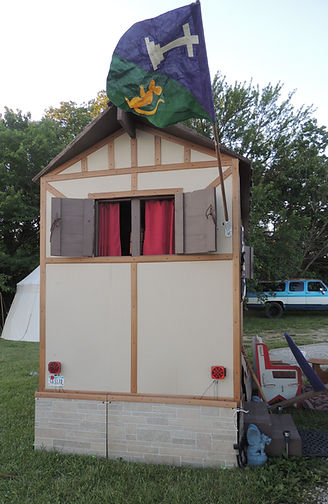
Just the new sign above the door.

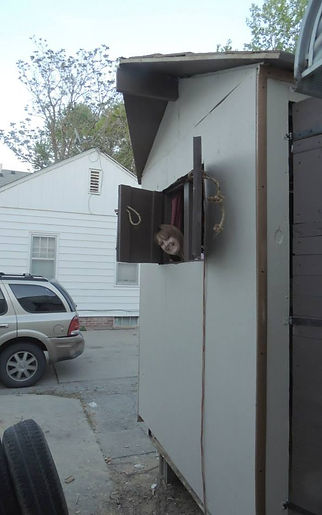
This is her 'kitchen' area. Just a big table that will have a fabric covering she makes to hide the trailer's tongue. The cubby for the jack and spare tire will double as a pantry. The wife was very happy.

Today, I jumped ahead and added the flooring. Hopefully I can get the roof in and installed before the next big rain...
The wife worked on curtains for the windows and closet. She got them done, but we just had hardware to hang this one.

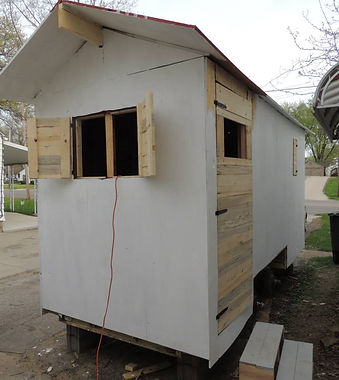
First coat of exterior paint done.
We finally got something to haul the trailer. We have nicknamed it "Babe our Big Blue Ox.
Initial roofing done. Just need the peak and maybe some trim on the edges. I also cut th points of the roof to shape. You can better see that, and the wife, on the picture to the right.
Speaking of the wife, She has finished the closet curtain and got it hung up, as well as the skirting for the bed

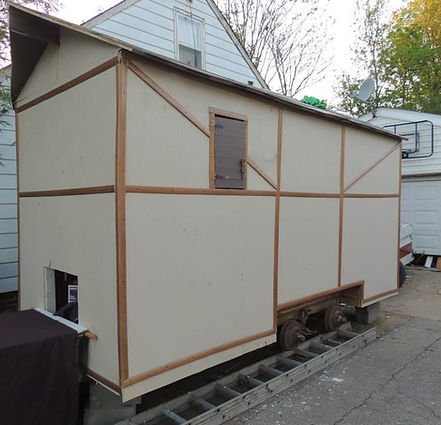
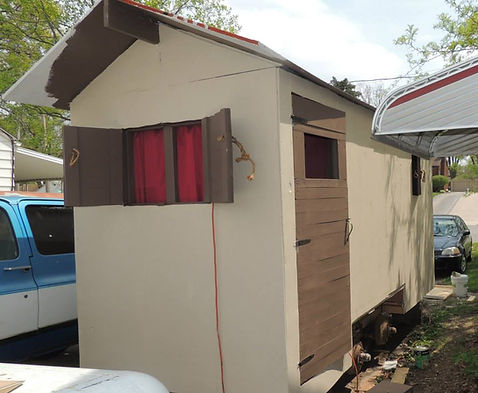
Trim is done on the front and back. Did some on the hitch side until I ran out. Need about 15 more pieces. Also, the wife finished the cover for the 'kitchen table'/hitch cover.


The trim is done, finally. Its not only screwed on, but we used Liquid Nails to ensure it isn't going any where.
This will become the skirting to hide the actual trailer and wheels.
Now things start getting... Interesting...
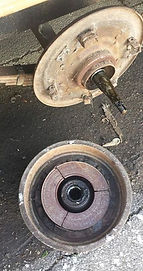
First comes the brakes. Aparently, this trailer stopped being made in 1978 and this style of brakes shortly after. So they are only available if you can find them from salvage yards. We were going to try to modify them, but the drum is too narrow. So we will be needing new axles with new brakes. But I really want to move the trailer and get it weighed, so.......


Four wheels on - Check
2 Blocks out,Wheels partially supporting trailer - Check
4 blocks out, Wheels Fully supporting trailer - Check
Hitch height adjusted and hitch on - Check
Trailer on truck hitch - check
Final wiring of lights into correct controller - check - Though I had to bypass the 7 pin and rewire the other goofy one. This will need to be revisited when I get new axles
Lights tested - check
First test of truck's ability to move trailer - NEXT!!
To use modern terms: Epic fail.
Started out fine, truck had no problem pulling the trailer. Soon as we hit the bump at the end of our drive, the piece between the springs (I think its called a rocker?) folded. Apparently it folded to its proper position which it wasn't in previously since the trailer was so light. But it folded enough to send the wheels up and grind the tires to a hault in the wheel wells. Even when I jacked it up, the wheels stayed put.
We spent the next 3+ hours trying to wedge boards between the axle and frame to force them apart enough to get it home. A task that simply would not have happened without the aid of a good friend.
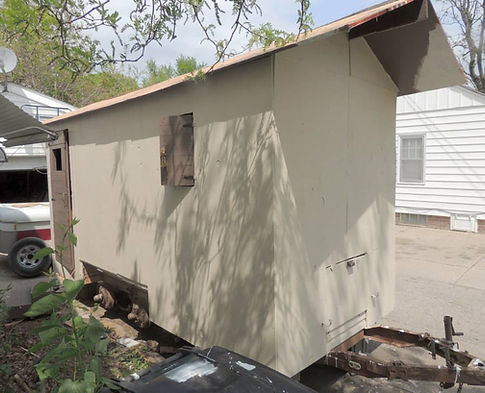
Its finally home. The fix for this, really isn't that bad. Really, its the same fix as the fix for the brakes. It just becomes a must-do before the trailer goes any where. I need two axles as before, but when putting them on, I need to flip them which will give me 6-8" of additional clearance. Which is what I tried to do before even starting the build. Key is finding the axles quickly enough for the trip we are planning.


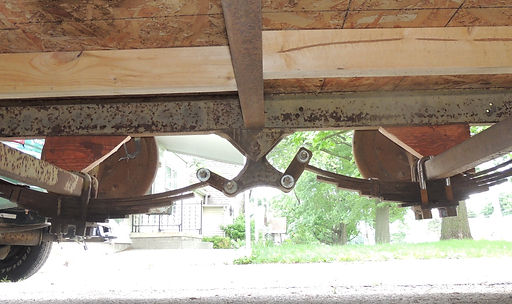

I will have to say, there were positives too. The truck performed awesomely! No problem pulling it, not even after the wheels were locked and it had to literally drag it to get it out of the middle of the road. After we got it braced up so the wheels would move, we needed to move slowly to get it home without popping a brace out. For most the trip around the block, I actually just let it idle itself forward, using the brakes because it was pulling faster than I wanted to go.
...and painted the window for the door.
Meanwhile, the wife has hand woven cording to replace the ugly gope closures on the windows...
While I made a door knocker

The axles and all should arrive tomorrow. So today I finished up the wind deflector and bolted it the the roof of the Babe the Big Blue Suburban.


We leave for vacation in Just over 48 hours. Ready, set. GO!

Okay, we cut it close, real close. Axles went on easlilly. Brakes as well but I couldn't get the bearing's castle nuts on. After tons of trying and advice, I ground them down so they were shorter and I could get the cotter pins in. After that, the wheels went on fine.
I wired the brakes and lights per the instructions. Silly me. Didn't work at all. Set those aside and called for assistance. Meanwhile I got the swaybar and a few other things finished. Then back to the lights.
We worked several hours and got close. Came back the next day, vacation day, to finish up. No go. The guys worked their tails off and 3 hours after we planning on leaving, we were backing out of the drive! No running lights, but we will be traveling during the day. We will try to totally rewire everything before the next trip.
We took it a couple blocks to our church's parking lot and did some turns, backing up, etc to make sure all was well. Then we went to a truck stop. Again, more turns, filled the tires, had to back her around a bit and got her weighed. Right at about 4000#. Then we struck out. Three hours later we were on site having had smooth travels!

Setup took longer than expected, but still under two hours. BUT, it was a very easy setup. We were tired, but not exhausted, not in pain and still had energy to do things that night. Even leaving 3 hours late, we were still setup well sooner than we would have been with our prior setup! WIN!!


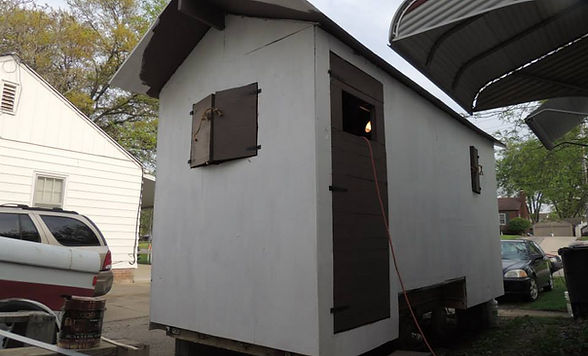
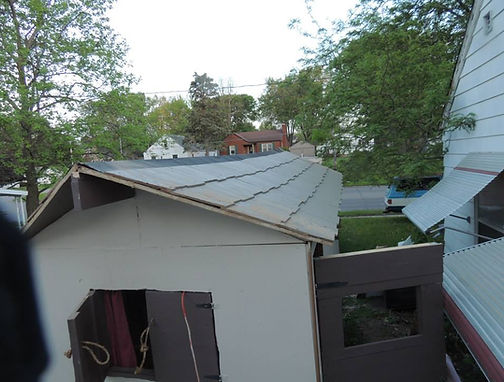
Camp is setup! Eventually we will have an awening and a few other things. But here you can see the skirting, chairs, rugs, banner etc. This is home for the next 10 days!

First steps inside...


Our view for the week...
There and back again,
a Ballanwode Manor Tale.
Thanks for coming along on this journey with us! It has been fun, painful, exciting, agrivating and WELL worth it for us! May your journeys be as thrilling.
Here are a few final tidbits of info:
--Loaded, it weighs right at 4000#
--The truck gets a little under 7 MPG towing it.
--'Babe' pulled it without a blink. Not sure if it was the sway bar or what, but there wasn't any sway
--Solar didn't work well at all. I think it was because I got too small, too junky of a battery.
--I do think the truck needs new brakes. Also something hanging off the back bumper to catch the gunk coming off the exhaust.
--Up to the axle issues, the cost of the project was about $4500. The axels and all that came up the last week quickly added another $1100-$1200.
bottom of page